
Starting robotics with the SCUTTLE robot
As mentioned in my last post I have started tinkering with mobile robots. My current goal is to build an outdoor capable autonomous mobile robot. The first problem I have to solve in order to move towards my goal is that I know a decent amount about software, a reasonable amount about structures and mechanics and very little about electronics. Oh and I know nothing about the robotics algorithms like how navigation works, the fact that robots may have a hard time figuring out where they are and that decision making is hard for robots.
So in order to not have to learn all the things at the same time I decided it would be sensible to start off buying a kit that I could assemble and learn to work with. The basic requirements were
- Something that didn't require me to solder electronics or 3d print parts, because I have neither of those tools, yet ...
- Capable of actually carrying a load of some sort. Most robot kits are fun platforms to play with but other than driving around they're not actually capable of carrying things. I want my robot to be able to carry things for me.
- With accessible hardware and software so that I could modify and extend it.
- Affordable, because money is still finite
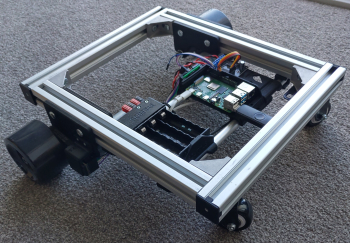
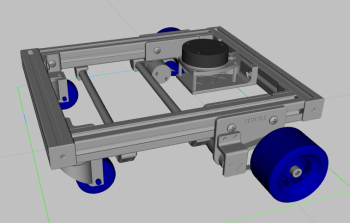
After a little bit of searching I decided to buy the SCUTTLE robot kit. The SCUTTLE kit is an open source kit for which all the build information is available online, from the 3D drawings to the material BOM. Additionally there is a lot of sample code that makes it easy to get going with the robot. There are code samples that allow you to drive the robot with a gamepad or by putting it in follow mode where it follows a coloured object. Note that when you pick a coloured object apparently orange is the best colour because of the colour difference with the surroundings. In my case initially I picked a dark red object in a poorly lit environment with lots of other variations of red around. You can probably imagine how well that went ...… [*]
Assembly of the SCUTTLE robot is pretty easy, it consists of aluminium T-slot lengths, some 3D printed parts and some electronics parts. The T-slot lengths are fastened with angle brackets and the 3D printed parts bolt to the T-slot lengths. The kit I bought only required connecting electronic parts with connectors, no soldering required. If you build a SCUTTLE from scratch there is some soldering to be done.
Once you have assembled your SCUTTLE you can test the functionality by using the code samples to verify the encoders and the motors. Note that it is wise to review your cabling before turning anything on because it is possible to connect some of the electronics incorrectly. I ended up breaking my Raspberry Pi, quite possibly by connecting the encoders backwards or something similar.
After verifying that the motors rotate in the correct direction you can try controlling the robot via the gamepad and drive it around the house.
Currently I'm working to update my SCUTTLE with the ROS software. Currently I'm testing with ROS noetic but I am looking to eventually switch to using ROS2 as it seems to have a more flexible navigation stack. More on that in a future post.
I'm also planning to add some sensors to my SCUTTLE to make it a bit more autonomous. The first plan is to add a bumper that will tell the robot if it has hit something. I have picked up some contact switches but am still thinking about the design for the bumper. Later on I want to add sonar, Time of Flight (ToF) sensors and potentially cameras as well.
[*] SCUTTLE drove straight at the red coloured couch instead of following the red object I wanted it to follow